


How to Change a Valve in a Dual Lever Kitchen Tap
A dripping kitchen tap is one of the most common plumbing problems in the home. The good news is that in most cases you don't need to replace the whole tap. Simply changing the faulty valve (also called a tap cartridge or ceramic valve) is usually enough to stop the leak and restore smooth operation. Modern ceramic valves are designed to be replaced and the job can often be completed in less than 30 minutes with a few basic tools.
It can sometimes be difficult to tell whether the hot or cold valve is causing the problem. The temperature of the drip is not always a reliable indication, as water can mix within the tap body or internal waterways before leaving the spout.
A simple way to check is to operate the tap and test each side individually. Run the hot water briefly, then turn it off and check whether the drip continues. Repeat the same process with the cold water. Pay attention to whether the drip changes or stops after using each side, as this can help identify which valve may be faulty.
If you are still unsure, the next step is to isolate the hot and cold water supplies separately and test the tap with only one supply connected at a time. This will confirm which side is causing the leak.
Once you have identified the faulty side, you can replace the corresponding valve and if in doubt, buy both!
Before You Start
You will need:
- Replacement tap valve(s)
- Adjustable spanner or ring spanner
- Small Allen key or screwdriver (depending on your tap)
- Soft cloth
- Silicone grease (optional)
Always turn off the water supply before starting. If your tap has isolation valves under the sink, close these first. If not, turn off the mains water supply and open the tap to release any remaining pressure.
Step 1 – Remove the Handle
Most dual lever kitchen taps have a small grub screw hidden behind or underneath each handle.
If the handle is stiff, avoid forcing it. Gently wiggle the handle while pulling, as limescale or debris can cause it to become stuck. A small amount of lubricant, such as WD40, may help if required.
Kitchen tap handles are attached in a few different ways:
Grub screw fixing – The most common type on modern lever taps. Look underneath or behind the handle for a small hole containing an Allen grub screw (usually 2mm, occasionally 2.5mm). Loosen the screw and slide the handle off.
Screw behind indicator cap – Some taps hide the fixing screw beneath a red/blue hot and cold indicator cap or chrome cover. Carefully remove the cap with a small flat screwdriver to access the screw underneath.
Pull-off handle – Some manufacturers use push-fit handles that pull directly off the spindle. These can become tight over time, so gentle movement while pulling will usually help.
Screw-on handle – Less common, but some handles unscrew directly from the tap body. If there are no visible screws, try checking whether the handle rotates off.
Step 2 – Remove the Valve Cover (if fitted)
Some taps have a decorative chrome shroud covering the valve.
Simply unscrew this by hand. If it is tight, wearing a rubber glove can help improve your grip without damaging the finish.
Step 3 – Unscrew the Old Valve
Using a suitable spanner, carefully undo the valve by turning it anti-clockwise.
Older valves can be tight due to limescale, so don't be surprised if they need a little extra force to free them.
Step 4 – Check the Replacement Valve
Before fitting the new valve, compare it carefully with the old one to ensure it is the correct replacement.
Check:
- Overall length
- Number of splines or teeth
- Thread size
- Clockwise or anti-clockwise closing
- Hot or cold orientation
- Has brass bush come out attached to valve
Sometimes on older taps, the valve come out attached to the brass bush. If it is stuck to the old valve and cannot be removed easily, it is usually best to replace the bush rather than risk damaging it. See examples below
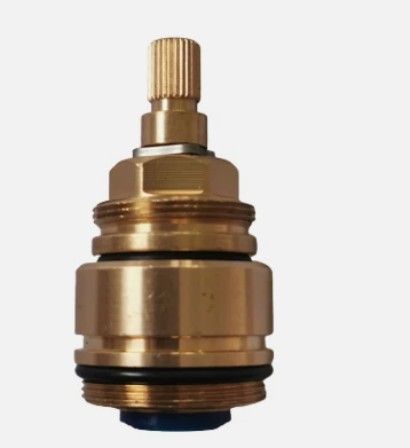
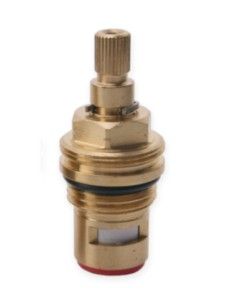
Many taps use different hot and cold valves, so fitting the correct replacement is essential.
Step 5 – Install the New Valve
Screw the replacement valve into the tap body by hand first to avoid cross-threading.
Once finger-tight, tighten it firmly with a spanner. It only needs to be snugn avoid overtightening, which can damage the valve or tap body.
Step 6 – Refit the Handle
Position the tap handle in its normal upright (off) position, then slide it onto the valve spindle. If the handle does not sit perfectly straight on the first attempt, remove it and reposition it on the splines until it is close to the desired position.
In some cases, achieving the perfect lever alignment may require a small adjustment to the valve itself. Try tightening or loosening the valve very slightly, then check the lever position again. Repeat these small adjustments until the handle sits correctly and you are happy with the final alignment.
Once the lever is positioned correctly, tighten the grub screw securely and replace the decorative cap.
Tip: If the handle is fitted while the valve is partially open, it may point in the wrong direction or not turn fully on and off. Always fit the handle with both the valve in the fully closed position and the handle in its normal off position.
Important – Horizontal Lever Taps such as Bridge Taps
On many kitchen taps with horizontal lever handles, the hot and cold ceramic valves may need to be fitted on opposite sides from what you would expect. This is because hot valves open clockwise, while cold valves open anti-clockwise. When replacing valves, always check that each handle is in its normal off position and opens in the correct direction. Depending on the tap design, the hot valve may need to be fitted on the cold side of the tap body, and the cold valve on the hot side.
Step 7 – Turn the Water Back On
Slowly reopen the isolation valves or mains water supply.
Check that:
The tap turns on and off smoothly.
Water flow is normal.
There are no leaks around the valve.
The dripping has stopped.
Common Problems
- The valve won't come out
Limescale can make valves difficult to remove. Applying steady pressure with the correct spanner usually frees them. Avoid using excessive force that could damage the tap. Use some WD40 if necessary.
- The brass bush came out with the valve
This is very common. If the brass retaining bush comes out attached to the old valve, don't panic. Clean the bush and the inside of the tap body, apply a small amount of Loctite 638 to the bush threads, then screw the bush and old valve back into the tap. Leave for around 20 minutes before unscrewing the valve again. The bush should remain securely in the tap body, ready for your new valve. Only Loctite 638 should be used for this repair. If you cannot seperate both parts, you will need to buy a new bush.
- My tap is still dripping
If you have fitted the correct replacement valve and the tap is still dripping, there may be another issue. The valve seat or tap body could be damaged, or the replacement valve may not be the correct type for your tap.
The temperature of the drip is not always an indication of which valve needs replacing. Some customers assume that a cold drip means the cold-side valve is faulty, replace it, and find the tap is still dripping. Water can sometimes mix within the tap body or travel through the internal waterways, meaning the drip temperature does not always identify the faulty valve.
A new valve may also take a few days to fully "bed in", so monitor the tap during this time. However, do not leave a dripping tap unresolved for too long, as prolonged leaking can cause damage to internal components and may lead to more costly repairs.
- Replacement valve/cartridge feels stiff to move after installation
It is not uncommon for a new cartridge to feel slightly stiffer at first, as the internal seals need a little time to bed in. This usually improves with normal use over time. In the meantime, please check that the cartridge has not been overtightened during installation, as this can affect it's movement. If possible, remove and refit the cartridge to ensure there is no debris affecting its operation. If the stiffness persists or worsens, please let us know and we will be happy to review the issue further.
Need Help Identifying Your Valve?
Thousands of kitchen taps look almost identical but use completely different valves.
At TapSparesUK, we help customers identify the correct replacement valve every day. If you are unsure which valve you need, simply contact us via our "identify my tap" form, so we can advise further. Send us a photo of your tap and we will help you find the right part before you order. You can also browse our fitting guides and installation videos for many popular brands.
Replacing a tap valve is one of the easiest and most cost-effective plumbing repairs you can carry out. With the correct replacement part and a few basic tools, you can usually stop a dripping tap and restore smooth operation saving the cost of replacing the entire tap along with a plumber's fee.