


If your kitchen tap is dripping and uses an SMR mini valve, replacing the valve is much cheaper than replacing the whole tap and is a repair many DIYers can do themselves.
There are two types of SMR mini valve: the older 2-flat sided nut design and the newer 6-sided hex version. Each is removed slightly differently.
This guide shows you how to identify which valve you have, remove it safely, and fit the replacement.
What You Will Need
Before you start, gather the following tools:
- Allen keys (for removing the handle, usually 2mm or 2.5mm)
- Adjustable spanner or deep socket set
- Flat-head screwdriver
- Valve Removal Tool (if you have the 2-sided nut valve)
- Penetrating oil (if the valve is seized)
- Replacement SMR mini valve
Top Tip: Put the sink plug in before you begin. Small screws have a habit of disappearing down the plughole!
How Do You Know the Valve Needs Replacing?
A faulty ceramic valve is one of the most common causes of a dripping kitchen tap.
You may notice:
- The tap drips even when fully turned off.
- The handle feels stiff or difficult to turn and may be dripping water around it.
- Water won't shut off completely.
- The tap starts leaking after being turned on and off.
If your tap is leaking from around the base of the spout or underneath the sink, the problem is likely something different, such as an O-ring or flexible hose.
Step 1 – Turn Off the Water
Before taking anything apart:
- Turn off both the hot and cold water supplies.
- Open the tap to release any pressure.
- Keep a towel nearby to catch any remaining water.
Never try to remove the valve while the water is still turned on.
Step 2 – Remove the Handle
Most kitchen taps have a small grub screw located underneath the handle, behind the handle, or hidden beneath the hot and cold indicator cap.
- Remove the decorative cap if there is one.
- Undo the grub screw using the correct Allen key (usually 2mm or 2.5mm).
- Lift the handle off.
- Remove the chrome valve cover if your tap has one to expose the valve.
Which SMR Valve Do You Have?
Once the valve is exposed, you’ll see one of two designs.
Older Style – Two Flat Sides
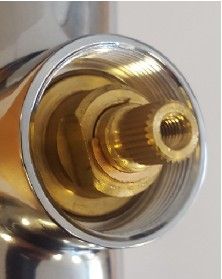
The older SMR valve has two flat sides on the brass body instead of a normal hexagonal nut.
This design can be difficult to remove because ordinary sockets and spanners don't grip it properly.
Many people accidentally damage these valves by using:
- Grips
- Spanners
- Adjustable pliers
- Incorrect sockets
The safest method is to use a valve removal tool designed specifically for the two-flat cartridge.
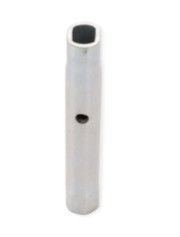
The tool grips both flat sides evenly and allows the valve to unscrew without damaging the tap body.
Newer Style – 6-Sided Hex Valve
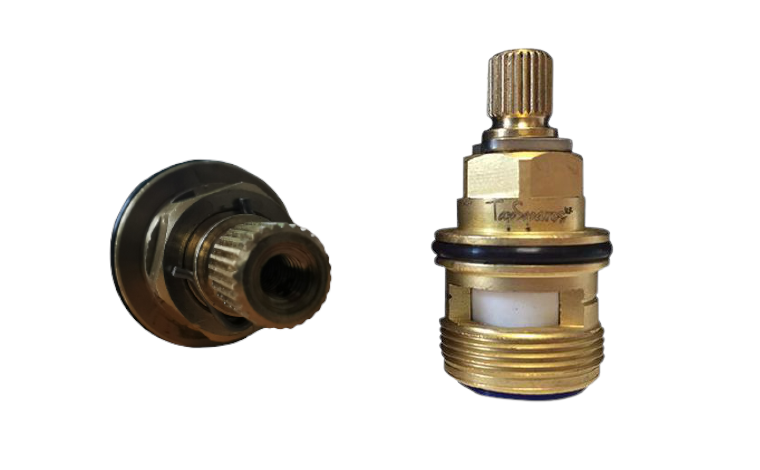
If your valve has six flat sides like a standard nut, this newer design is much easier to remove.
- Fit the correct size deep socket or box spanner over the valve.
- Make sure it is fully seated.
- Turn anti-clockwise.
- Lift the valve out once loose.
Fitting the New Valve
- Clean any dirt or limescale from inside the tap.
- Check the sealing washer is in place.
- Carefully screw the new valve in by hand first.
Once hand-tight, gently tighten it with a spanner. There is no need to overtighten it.
Common DIY Mistakes
- ❌ Forgetting to turn the water off.
- ❌ Using pliers on the two-flat valve.
- ❌ Overtightening the new valve.
- ❌ Ordering the wrong hot or cold cartridge.
- ❌ Forcing a seized valve instead of using penetrating oil.
Taking your time usually saves a lot of frustration later.
Frequently Asked Questions
Can I repair the old valve instead?
In most cases, no. SMR mini valves are sealed ceramic cartridges, so they are designed to be replaced rather than repaired.
Can I use a normal socket on the older valve?
Usually not. The older two-flat design doesn't provide enough grip for a standard socket, which is why a dedicated removal tool is recommended.
Should I replace both valves?
If your tap is several years old, replacing both the hot and cold valves at the same time is often worthwhile.
Why is my tap still dripping?
If you have fitted a new valve and the tap still drips, check:
- A dripping tap doesn't always mean the valve on the side you suspect is faulty. For example, even if the drip feels cold, it could still be the hot valve letting by, and vice versa. Turn off the water supply to the side you suspect, run that side of the tap until the water stops, then wait to see if the dripping continues - if it does, the valve on the opposite side is likely the cause.
- The valve is fully seated.
- The sealing washer is fitted correctly.
- The tap body isn't damaged or heavily worn.
Need Some Help?
Replacing an SMR mini valve is a repair many homeowners can carry out themselves with the right tools and a little patience.
If you are unsure which valve your tap uses, we are always happy to advise.
Simply get in touch, send images of your tap and/or valve via our Identify my tap form and we will identify it for you.
A simple valve replacement could save you the cost of buying a brand-new tap.